
Dynamically Generated Open Graph Images in Jekyll
Creating a plugin to generate og:images
This has been updated to use NodeJS. Scroll to the bottom for the update.
Since moving my this site to Jekyll I’ve been thinking of ways I could leverage all the powers of Jekyll to my advantage, one of those I came up with recently was Open Graph. To find out more about Open Graph itself, please visit the website, this post won’t describe everything you need to know about OG (and its Twitter counterpart.)
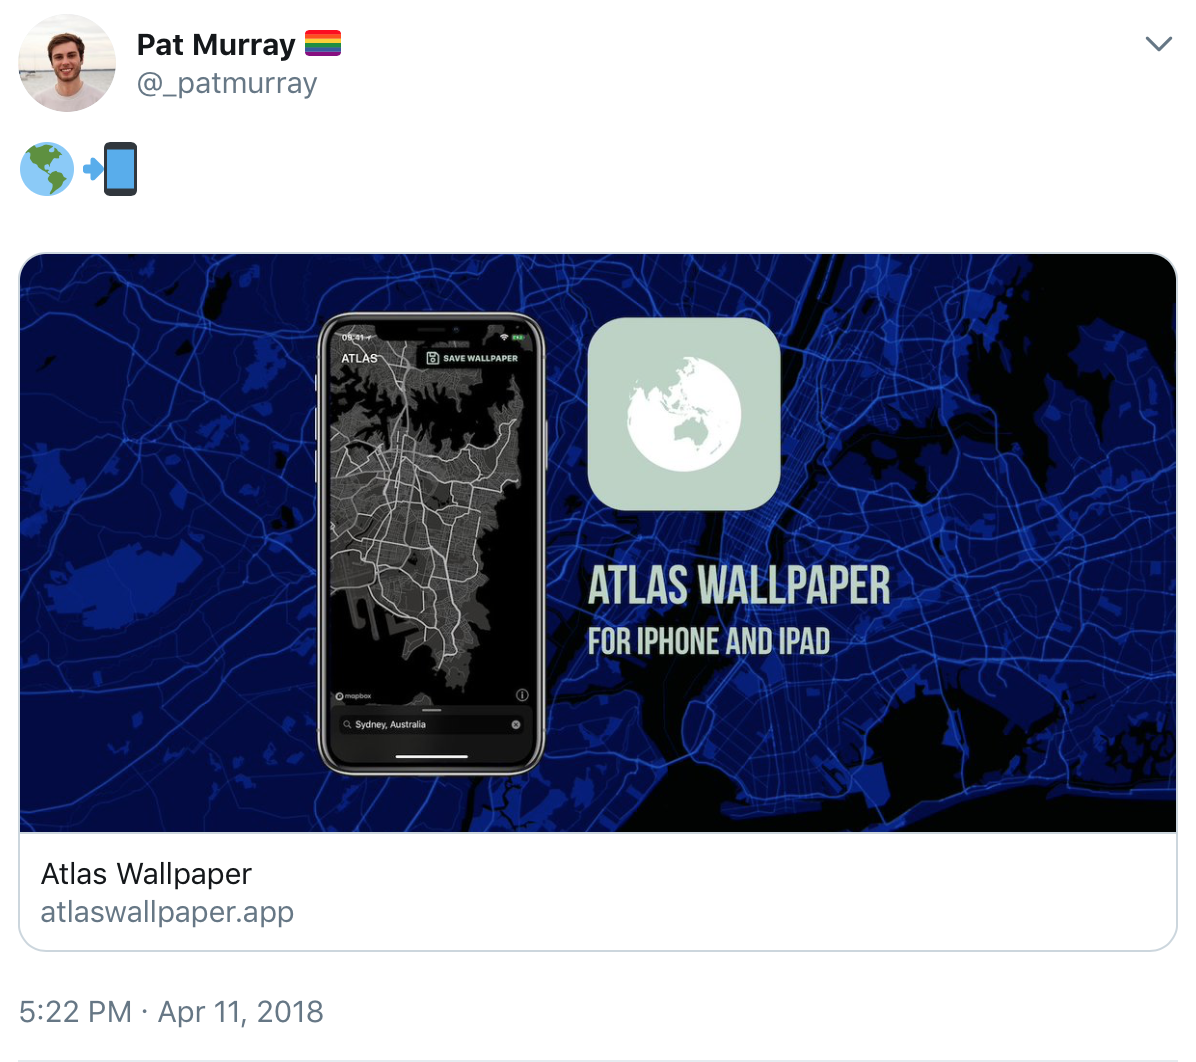
I love adding large og:images to my website for sharing on Twitter. I usually craft a nice artwork that will render for each share. For example with my app Atlas Wallpaper, if you tweet the website url (https://atlaswallpaper.app) there is a nice big banner:
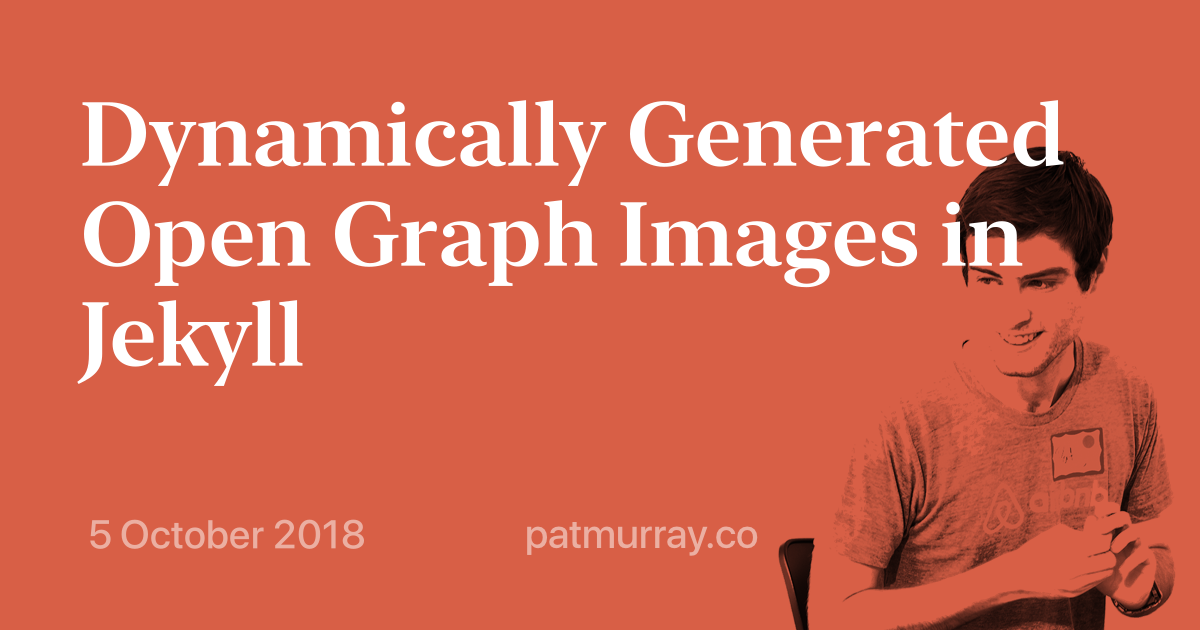
I wanted these for my blog posts too, but didn’t want to have to create them each tie by hand, so I set out to make a Jekyll plugin to make them for me. I’ve never used Ruby before and don’t have much experience dynamically generating images so the learning curve wasn’t gradual but I got it done and the og:image for this post is:
How it works:
Firstly, I didn’t want to mess around with ruby gems just yet so I just created the plugin in my site’s _plugins folder. This will need to be rectified in the future, but it works for now. Secondly, I know I wanted to have one on any page, but not every page. So it needed to be called from Liquid (the Jekyll templating engine.) With these two requirements set I went to build it.
module Jekyll
    class OGFilter < Liquid::Tag
    end
end
Liquid::Template.register_tag('og_filter', Jekyll::OGFilter)
I created a class called OGFilter which is a Liquid tag ({% these things %}) interpreter. Now anywhere I type {% og_filter %} in a liquid page a new image will be created and the URL inserted at that point. Pretty neat hey?
Well Jekyll plugins can come in a few flavours, each with its own required definitions/functions/methods. The Tag type must contain:
def initialize(tag_name, text, tokens)
… and …
def render(context)
The first one takes the parameters needed from the tag, and render is where the actual rendering happens. For the simple use case I have, I took no parameters and as such my initialise is just a call to super and nothing else. So render is where the magic happens.
The context parameter is from Liquid and in it you can access any of the same variables you have in your page, for example page and site (and all their related variables.) This makes it really easy to get page attributes for use.
This uses ImageMagick to create the image, and a static background (the drop shadow) created in Sketch. It also uses an sha hash for file names. As such the requirements for this module are:
require 'rmagick'
require 'rickshaw'
And of course, jekyll, which is already included. I take a hash of the page for the filename, get the background image, overlay the text of the title, output that to a folder, and return the URL. It’s pretty simple once you look at it:
def render(context)


    # This creates an image id hash from the page id in Jekyll
    id = context["page"]["id"].to_sha1

    # Check if the file already exists in the 'opengraph' foldler, return early if it does
    if(File.exist?("#{Dir.pwd}/opengraph/#{id}.png"))
        puts "File exists #{Dir.pwd}/opengraph/#{id}.png}"
    else

        # Create an image list from ImageMagic using the base image
        img = Magick::ImageList.new("#{Dir.pwd}/assets/artboard.png")

        # Create a caption of the title in a smaller area and center aligned.
        text = Magick::Image.read("caption:#{context["page"]["title"]}") {
            self.fill = '#D85F46'
            self.font = "SF-Pro-Display-Medium"
            self.pointsize = 50
            self.size = "800x500"
            self.gravity = Magick::CenterGravity
            self.background_color = "none"
        }.first

        # Composite the two images over each other (witht the smaller text image being centred)
        a = img.composite(text, Magick::CenterGravity, 0,0, Magick::OverCompositeOp)

        # Write out the file
        a.write("#{Dir.pwd}/opengraph/#{id}.png")
    end

    # Get the site variable
    site = context.registers[:site]

    # Add the file to the list of static_files needed to be copied to the _site
    site.static_files << Jekyll::StaticFile.new(site, site.source, "/opengraph/", "#{id}.png")

    "/opengraph/#{id}.png"

end
It works (with some hiccups) and now I just need to improve the image to not look terrible. Thanks to the way I can just regenerate my entire site with a button click using Jekyll, once I improve it all the og:images will be improved immediately too—no effort from me.
Let me know of you use this too on your blog!
Update
Imagemagick’s text render requires ghostscript which is unfortunately not available in all locations, like my web host Netlify. As such the above code needed to run on a local machine or VPS before deploying to Netlify for each new blog post I wrote. This was annoying as it prevented me quickly deploying new blog posts.
In my search for a way to get ghostscript installed on Netlify, I recalled that Netlify actually installs dependencies for all package managers regardless of what the build instructions are. With this in mind I decided to give NodeJS a try for this. I know how to layout a canvas, render it to an image and finally save it to a file, so I started there. I found a package that allows the use of canvas in non-browser enviroments without needing phantomjs or similar. Using this I translated my ruby layout code to canvas and had it output a file:
const canvas = createCanvas(1200, 630);
const ctx = canvas.getContext('2d');

// Draw cat with lime helmet
loadImage('./assets/artboard2.png').then((image) => {
    ctx.drawImage(image, 0, 0, 1200, 630);

    ctx.textBaseline = "top";

    // Write title
    ctx.font = '90px SF-Pro-Display-Medium';
    // ctx.font = '90px sans-serif';
    ctx.fillStyle = '#ffffff';
    wrapText(ctx, program.title, 80, 80, 1100, 100);
    // ctx.fillText(program.title, 80, 80);

    // Write date
    ctx.textBaseline = "bottom";
    ctx.font = '40px SF-Pro-Display-Medium';
    ctx.fillStyle = '#EBAFA2';
    ctx.fillText(program.date, 80, 555);

    const out = fs.createWriteStream(program.filename)
    const stream = canvas.createPNGStream()
    stream.pipe(out)
    out.on('finish', () => console.log('The PNG file was created.'))

})
This code looks very similar (with some slight changes to pixels between the two systems) to the ruby version above.
This posed the next issue, getting Jekyll to talk to Node… I decided to turn my node script into a command line tool and use the ruby system function to call it. I installed commander and make the division of duties decision to have node just render the image, so the no string or date manipulation. As such the script takes three parameters:
program
    .option('-t, --title <title>', 'The title of the article')
    .option('-d, --date <date>', 'The publish date of the article')
    .option('-f, --filename <filename>', 'The ogimage filename')
    .parse(process.argv);
Title, date (a string of the date already formatted), and filename (the full filename for the resultant image). I kept the majority of the ruby script the same as before:
def render(context)

    # This creates an image id hash from the page id in Jekyll
    id = context["page"]["id"].to_sha1

    # Check if the file already exists in the 'opengraph' foldler, return early if it does
    if(File.exist?("#{Dir.pwd}/opengraph/#{id}.png"))
        puts "File exists #{Dir.pwd}/opengraph/#{id}.png}"
    else

        # the script to be called with the formatted title, and resolving filename
        script = "node #{Dir.pwd}/opengraph.js -t '#{context["page"]["title"]}' -d '#{context["page"]["date"].strftime("%e %B %Y")}' -f '#{Dir.pwd}/opengraph/#{id}.png'"

        system(script)

        puts script
    end

    # Get the site variable
    site = context.registers[:site]

    # Add the file to the list of static_files needed to be copied to the _site
    site.static_files << Jekyll::StaticFile.new(site, site.source, "/opengraph/", "#{id}.png")

    "/opengraph/#{id}.png"

end
By calling the script node #{Dir.pwd}/opengraph.js it can run without having to build or anything, just install dependencies and be in the correct pwd and you’re good. This works perfectly with Netliy’s deployment model.
This means that the date formatting and hashing of the id—I was already using—continue to work, saving me having to regenerate images for the backlog, allowing for incremental builds1.
Further, canvas doesn’t natively support word wrapping like imagemagick did. Fortunately, the internet has solved this problem for me so I just stole this short function:
function wrapText(context, text, x, y, maxWidth, lineHeight) {
    var words = text.split(' ');
    var line = '';

    for (var n = 0; n < words.length; n++) {
        var testLine = line + words[n] + ' ';
        var metrics = context.measureText(testLine);
        var testWidth = metrics.width;
        if (testWidth > maxWidth && n > 0) {
            context.fillText(line, x, y);
            line = words[n] + ' ';
            y += lineHeight;
        } else {
            line = testLine;
        }
    }
    context.fillText(line, x, y);
}
Lastly, fonts. The whole issue with needing ghostscript was because text needs fonts. Thankfully the canvas package I used allows for the loading for font files to use. So I just copied in my font of choice and load it in before creating the canvas.
registerFont('./fonts/SF-Pro-Display-Medium.otf', { family: 'SF-Pro-Display-Medium' })
The beauty of this solution is it will run anywhere that node can run, without any system dependencies. Polygot systems win again!
-
Also saves having to deal with dates in javascript because that is too much of a pain I don’t need. ↩